Why This Banana Pudding Is Layers of Heaven
There’s a reason banana pudding holds a sacred spot at every Southern table, every church potluck, and every summer barbecue worth remembering. One spoonful of this creamy banana pudding and you’ll understand why folks call it “layers of heaven.” Picture this: pillowy vanilla wafers softened just enough to yield to a spoon, sweet ripe banana slices nestled between ribbons of silky pudding, and a cloud of fluffy whipped topping on top. It’s comfort in a dish.
This easy banana pudding recipe delivers all that nostalgic, old-fashioned banana pudding goodness without requiring you to slave over a stove for hours. It’s a no-bake banana pudding dessert that comes together in about twenty minutes of hands-on work, then does its magic in the refrigerator while you set the table, wrangle the kids, or simply kick back with a glass of sweet tea.
Whether you’re bringing a potluck dessert to a neighbor’s cookout, whipping up a summer dessert recipe for a backyard gathering, or searching for a make-ahead dessert for the holidays, this layered banana pudding checks every box. It’s simple enough for a first-time baker yet impressive enough to earn compliments from the most discerning dessert critics at the table.
What Makes This Banana Pudding Recipe Special
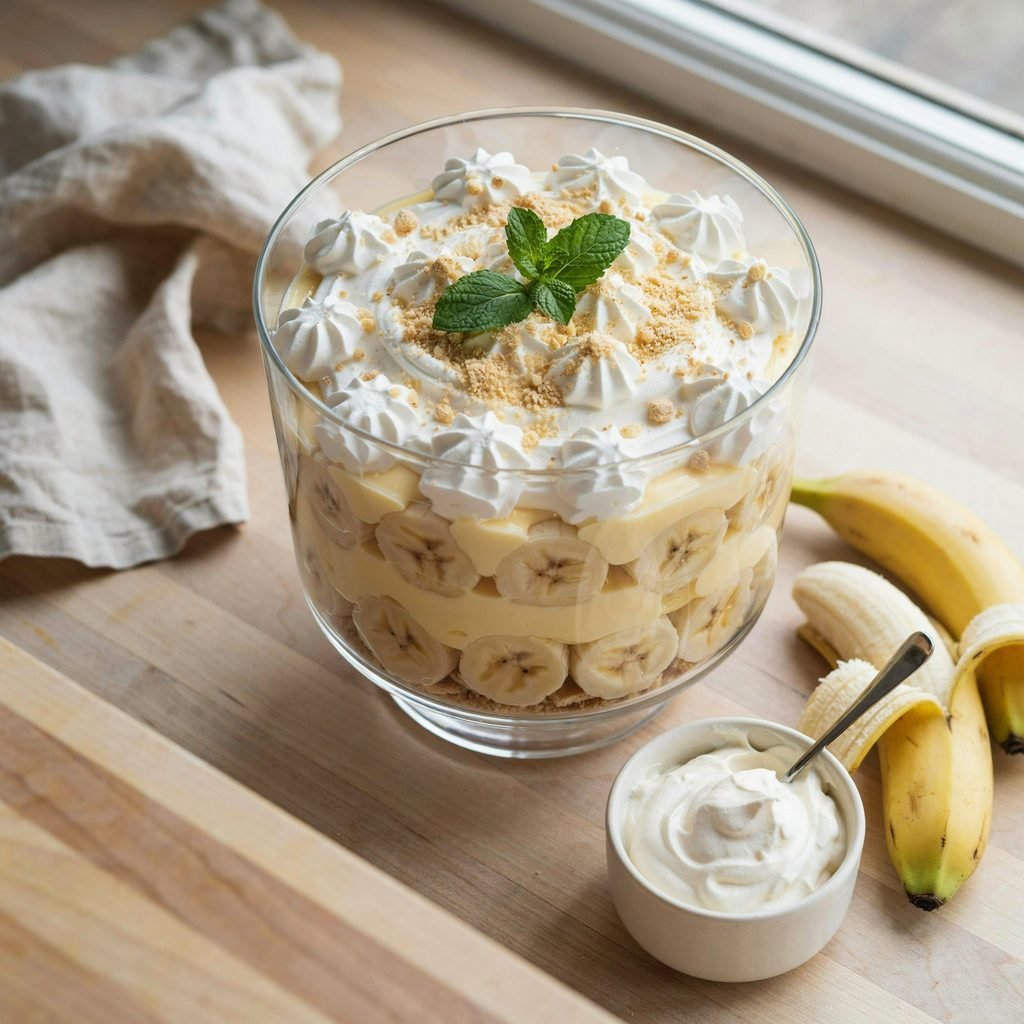
What sets this banana pudding layers of heaven apart from a rushed, one-note dessert is balance. Each component plays a role. The instant vanilla pudding provides a cool, custard-like base. The sweetened condensed milk adds a rich, caramel-kissed sweetness. Fresh banana slices bring natural fruitiness and a soft bite. Vanilla wafers contribute that iconic crunch that gradually mellows into a cake-like tenderness as the pudding chills. And the whipped topping? It lightens everything, making each spoonful feel like a little cloud.
The secret weapon here is time. When you chill a homemade banana pudding for several hours, the flavors marry. The cookies absorb just enough moisture to soften without dissolving. The pudding sets into clean, scoopable layers. The bananas sweeten slightly as they rest in their creamy surroundings. The result is a Southern banana pudding that tastes like it took all day to prepare, even though you assembled it before dinner.
Ingredients You’ll Need
This banana pudding recipe with condensed milk uses pantry-friendly ingredients you can grab at any grocery store. Here’s what you’ll need:
For the Pudding Mixture:
- 2 (3.4 oz) boxes instant vanilla pudding mix
- 3 cups cold whole milk (or 2% milk)
- 1 (14 oz) can sweetened condensed milk
- 1 teaspoon pure vanilla extract
- 1 (8 oz) container frozen whipped topping, thawed (or 2 cups homemade whipped cream)
For Layering:
- 4 to 5 ripe bananas, sliced into ¼-inch rounds
- 1 (12 oz) box Nilla Wafers or similar vanilla wafer cookies
Optional Additions:
- 4 oz cream cheese, softened and blended into the pudding for extra richness
- Sliced strawberries or caramel drizzle for garnish
- Crushed vanilla wafers or cookie crumbs for topping
- A pinch of ground cinnamon or nutmeg for warmth
How to Make Banana Pudding Layers of Heaven
Learning how to make banana pudding this way is refreshingly straightforward. Follow these steps for a flawless result every time.
Step 1: Prepare the pudding base. In a large mixing bowl, whisk together the instant vanilla pudding mix and cold milk for about two minutes until the mixture thickens and becomes smooth. Stir in the sweetened condensed milk and vanilla extract until fully combined. The mixture should be thick, glossy, and fragrant.
Step 2: Fold in the whipped topping. Gently fold the thawed whipped topping into the pudding mixture using a rubber spatula. Work in slow, sweeping motions so you keep the mixture light and airy. If you’re using cream cheese, beat it smooth first, then fold it in before the whipped topping.
Step 3: Layer the dessert. In a 9×13-inch glass baking dish, a large trifle bowl, or individual banana pudding cups, start with a single layer of vanilla wafers on the bottom. Arrange a layer of banana slices over the wafers. Spoon about one-third of the pudding mixture over the bananas. Repeat the layers two more times, finishing with pudding on top.
Step 4: Chill. Cover the dish tightly with plastic wrap and refrigerate for at least four hours, though overnight is ideal. This rest is what transforms a simple instant vanilla pudding dessert into something truly special.
Step 5: Garnish and serve. Just before serving, add a final flourish—extra whipped topping, a few whole Nilla Wafers standing upright, crushed cookies, or a drizzle of caramel. Serve cold and watch the plates come back for seconds.
Practical tips: To prevent bananas from browning, slice them just before layering and tuck them between pudding and wafers so they’re not exposed to air. If you want extra protection, a very light squeeze of lemon juice on the slices helps, though it’s rarely necessary once they’re buried in pudding. To avoid watery pudding, always use cold milk—warm milk prevents the instant pudding from setting properly.
Best Bananas for Banana Pudding
Choosing the right bananas makes a real difference in this vanilla wafer banana pudding. Look for bananas that are bright yellow with just a few small brown speckles. They should be ripe and sweet but still firm enough to hold their shape when sliced.
Avoid bananas that are green (they’ll taste starchy and lack sweetness) as well as those that are heavily browned or mushy. Overly ripe bananas break down during chilling, releasing excess moisture and turning your beautiful layered banana pudding into a watery mess. A ripe-but-firm banana gives you clean, attractive slices and the perfect balance of sweetness and structure.
Tips for the Perfect Layered Banana Pudding
- Use cold milk. Instant pudding sets best with milk straight from the refrigerator. Room-temperature milk produces a looser, less stable pudding.
- Chill thoroughly. Aim for at least four hours, preferably six to eight. Overnight chilling gives the best texture and flavor development.
- Layer evenly. Aim for consistent thickness in each layer so every serving looks as good as it tastes.
- Add crunchy garnish late. If you want whole or crushed cookies on top for texture, add them within an hour of serving so they stay crisp.
- Choose your vessel wisely. A glass trifle bowl shows off the gorgeous strata. A 9×13 dish is practical for crowds. Individual banana pudding cups are perfect for parties and picnics where guests serve themselves.
Recipe Variations
This classic banana pudding recipe is wonderfully adaptable. Try these twists:
- Southern banana pudding with homemade custard: Replace the instant mix with a cooked custard of eggs, sugar, cornstarch, milk, and butter for an old-fashioned banana pudding experience.
- No-bake banana pudding: This recipe is already no-bake, making it a lifesaver in summer when you don’t want to heat the kitchen.
- Banana pudding trifle: Build the layers in a tall glass trifle bowl for a dramatic centerpiece. Add alternating layers of pound cake cubes for extra indulgence.
- Individual banana pudding cups: Layer the components in mason jars or clear plastic cups for grab-and-go servings at potlucks.
- Banana pudding with cream cheese: Blend softened cream cheese into the pudding for a tangier, denser, cheesecake-like filling.
- Banana pudding with Chessmen cookies: Swap Nilla Wafers for buttery Chessmen shortbread cookies for a richer, more luxurious crunch.
- Healthier banana pudding: Use sugar-free instant pudding, reduced-fat milk, Greek yogurt in place of some whipped topping, and a light hand on the condensed milk. You’ll still get a creamy banana pudding with fewer calories.
Storage and Make-Ahead Instructions
Banana pudding is one of the best make-ahead dessert options because it genuinely improves with a few hours of chilling. Store it covered tightly with plastic wrap or in an airtight container in the refrigerator. It will keep well for up to three days, though the wafers will continue softening over time.
Freezing banana pudding is generally not recommended. The pudding can separate and become grainy upon thawing, and the bananas turn mushy and discolored. If you must prepare components ahead, you can freeze the whipped topping portion separately, but assemble the full dessert no more than a day before serving.
For the prettiest presentation, add any cookie garnishes, fresh fruit, or caramel drizzle within the last hour before guests arrive. This keeps textures distinct and the dessert looking freshly made.
Frequently Asked Questions
Can I make banana pudding the night before?
Absolutely. In fact, overnight chilling is ideal. The wafers soften into a cake-like texture, and the flavors meld beautifully. Just add any crunchy toppings the next day.
How do I keep bananas from turning brown?
Slice bananas immediately before layering and press them gently into the pudding so they’re not exposed to air. A tiny squeeze of lemon juice on the slices adds extra insurance, though it’s usually unnecessary once layered.
Can I use homemade pudding instead of instant pudding?
Yes. Prepare your favorite cooked vanilla custard, cool it completely, then proceed with the layering steps. The homemade version gives you that traditional Southern banana pudding depth of flavor.
What cookies can I use instead of Nilla Wafers?
Chessmen shortbread cookies, golden Oreos, Lorna Doone shortbreads, or even graham crackers work beautifully. Each brings a slightly different texture and sweetness.
How long should banana pudding chill before serving?
A minimum of four hours is recommended. Six to eight hours—or overnight—produces the best texture and flavor integration.
Can I make this dessert in individual cups?
Yes! Layer the ingredients in 6-ounce mason jars, ramekins, or clear plastic cups. This banana dessert recipe works perfectly for individual portions and eliminates the need for serving utensils at events.
Recipe Card: Banana Pudding Layers of Heaven
Prep Time: 20 minutes
Chill Time: 4 hours (up to overnight)
Total Time: 4 hours 20 minutes
Servings: 12 to 15
Ingredients
- 2 (3.4 oz) boxes instant vanilla pudding mix
- 3 cups cold whole milk
- 1 (14 oz) can sweetened condensed milk
- 1 teaspoon pure vanilla extract
- 1 (8 oz) container frozen whipped topping, thawed
- 4–5 ripe bananas, sliced
- 1 (12 oz) box Nilla Wafers
- Optional: crushed cookies, caramel drizzle, or fresh berries for garnish
Instructions
- In a large bowl, whisk pudding mix and cold milk for 2 minutes until thickened.
- Stir in sweetened condensed milk and vanilla extract until smooth.
- Gently fold in the thawed whipped topping until combined and fluffy.
- In a 9×13 dish or trifle bowl, layer vanilla wafers, banana slices, and one-third of the pudding. Repeat twice more, ending with pudding on top.
- Cover tightly and refrigerate at least 4 hours or overnight.
- Before serving, garnish with extra whipped topping, whole or crushed wafers, and any optional toppings. Serve chilled.
Conclusion
There’s something deeply satisfying about a dessert that asks so little of you and gives back so much joy. This banana pudding layers of heaven is that dessert. It’s the easy banana pudding recipe you’ll pull out for every potluck, every holiday table, every lazy Sunday when you want something sweet without turning on the oven. It’s the dish that makes grandmothers nod approvingly and kids ask for thirds.
So the next time you’re wondering what to bring to a barbecue, a church supper, or a friend’s birthday dinner, reach for the bananas, the Nilla Wafers, and that can of condensed milk. Layer them with love, let the refrigerator do the hard work, and serve a creamy, dreamy Southern banana pudding that tastes like a warm hug in every bite.
Grab a spoon, gather your people, and dig in. This banana dessert recipe was made for sharing—and for savoring every last layer of heaven.
